
I didn't see a good walkthrough out there on integrating the new Sitecore Identity Server that comes with Sitecore 9.1 with Azure AD, so I decided to spend a (longer than anticipated) lunch session setting it up for myself. In Sitecore 9, you could use Federated Authentication to get much the same result -- so, why add Identity Server in to the mix? Having identity as a separate role makes it easier to scale, and to use a single point of configuration for all your Sitecore instances and applications (including your own custom applications, if you like). So, let's get to it!
This post is part of a series on configuring Sitecore Identity and Azure AD. You can view all posts in this series, covering setup to configuration, here.
To start, I've deployed a slimmed down XP-Single build (so that I can take advantage of personalization), and I've got an Azure AD setup already in place. This walkthrough assumes you've already installed Sitecore 9.1, Identity Server, and have Azure AD in place.
Configuring Azure AD
Start by adding your Application to the approved applications in your Azure Active Directory instance. I'm using the preview version of the application interface, which looks like this:
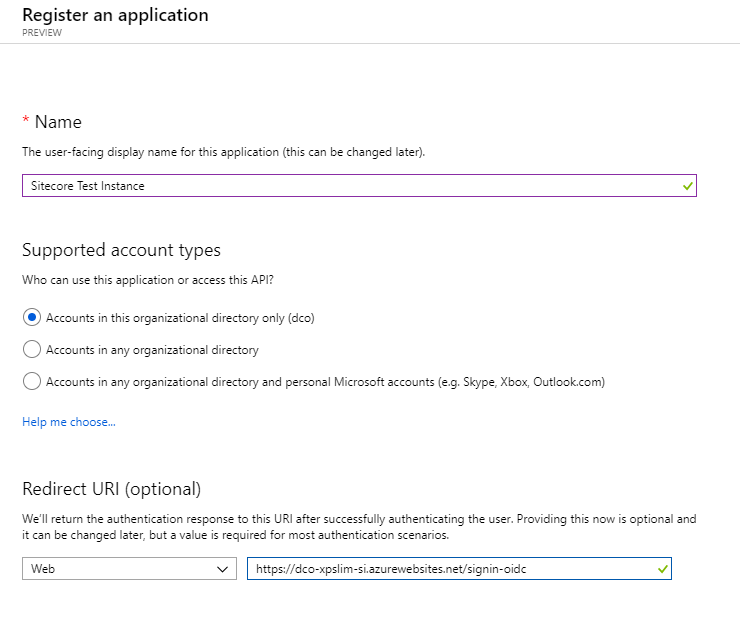
Give your application a friendly name (to help identify environment/application, for example). Also, for the redirection URI, you'll want to add the URL to your Sitecore Identity resource, suffixed with "/signin-oidc".
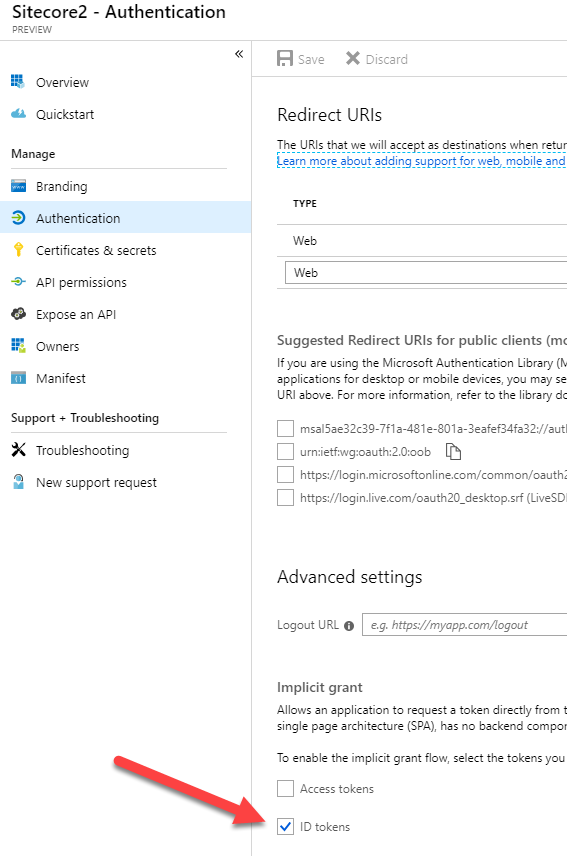
After creating the application, you'll want to enable ID Tokens to be passed between AD and Sitecore Identity. Open your application, and visit the Authentication section. The checkbox to enable ID tokens is under the Advanced Settings:
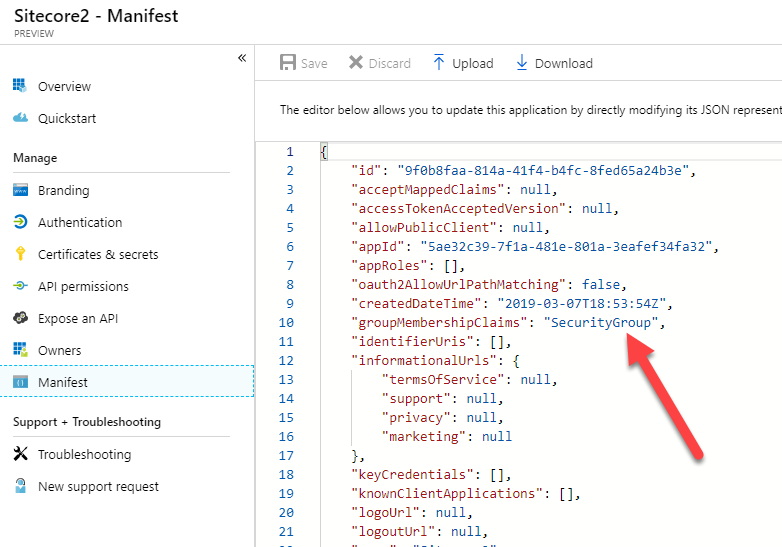
Next, lets visit the Manifest section. We're going to change the value of the "groupMembershipClaims" setting to "SecurityGroup". This will instruct Azure AD to pass along the identifiers of all Security Groups the authenticated user is a member of in the claims back to Sitecore Identity. Sitecore Identity can then use those claims to map back to roles in Sitecore -- which we'll see in a little bit.
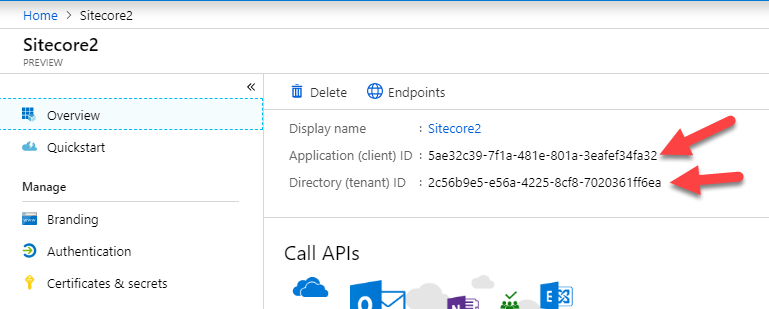
Finally, go back to the Overview screen of your Application, and copy out the Client and Tenant ID's. You'll need these when configuring Sitecore Identity.
Configuring Sitecore Identity
Let's move over to our Sitecore Identity instance to continue the configuration. Open your Sitecore Identity Server App Service, and pop open the App Service Editor under Development Tools. We're going to make these changes to the Identity Server instance directly, but you could certainly incorporate these actions as part of your build process, or even in the deploy of your Sitecore Identity server.
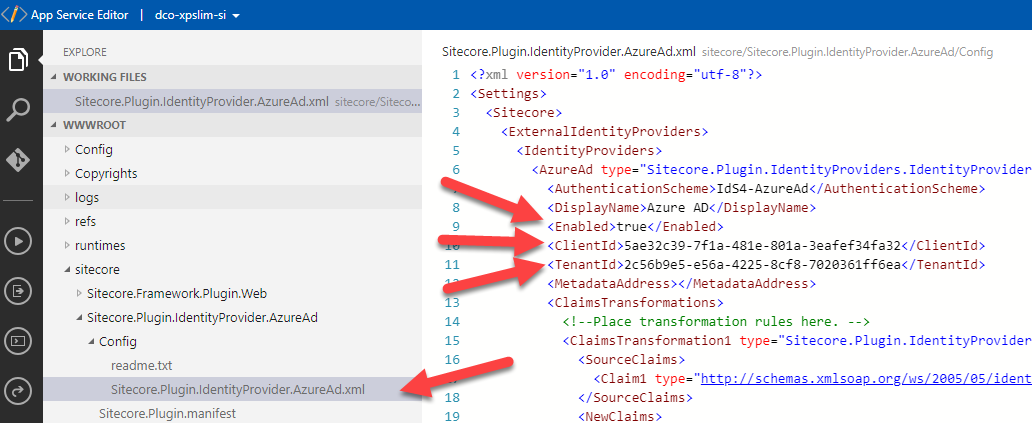
Once in App Service Editor, open up the /Sitecore/Sitecore.Plugin.IdentityProvider.AzureAd.xml file, and we're going to make the following changes:
- Under Settings:Sitecore:ExternalIdentityProviders:IdentityProviders:AzureAd, change the Enabled node to true.
- In the ClientId and TenantId nodes, you'll paste the GUIDs copied from the Azure AD Application you just created.
Restart your Sitecore Identity Application Service. You should now see a new Azure AD button on the login screen if you visit the Identity Server URL directly.
Configuring Sitecore (Optional)
Editor's note: If you're only federating with a single authentication source, this step is not required. You can skip to the next section -- "Logging In". The steps in this section are only necessary when multiple federation providers have been set up at the Sitecore Identity instance.
Finally, let's configure our Sitecore instance for authentication. Since this is XP-Single, I'll go to my single App Service instance that's running all Sitecore roles, and again open up App Service Editor. As stated before, this is the quickest way to configure for this walkthrough, but these changes could (SHOULD!) be part of your deploy process in the real world.
We'll open up the Sitecore.Owin.Authentication.IdentityServer.config file located in App_Config/Sitecore/Owin.Authentication.IdentityServer, and we're going to make the following changes to it:
- Scroll down to line 113, where there is a comment and a commented out config node showing how to add a sub-identity provider. We're going to uncomment the provider to make it active:

Logging In
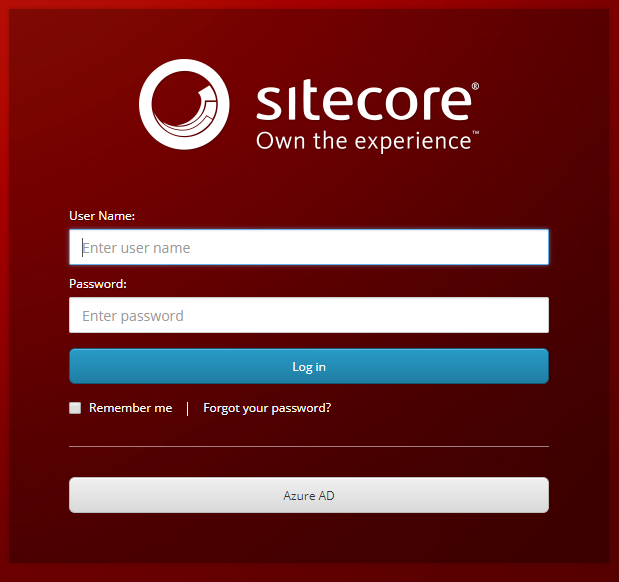
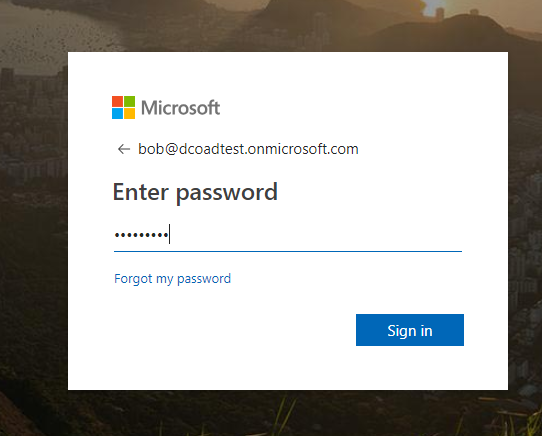
Okay, let's test this out! I'll go to mysitecore-single-server.com/sitecore, which redirects me to the Sitecore Identity login page. From there, I'll select Azure AD, and log in to the Azure AD page.
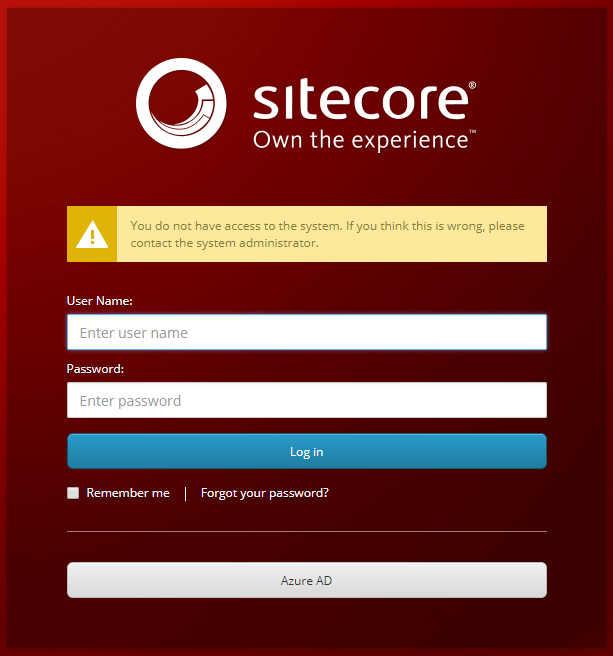
Once you authenticate, you'll know you have it all set up right if you get... an error message?
Mapping Roles
What's going on here? Well, just 'cuz you're in AD, doesn't mean you're automatically allowed to log in to Sitecore. You'll need to map group membership in Active Directory to roles in Sitecore.
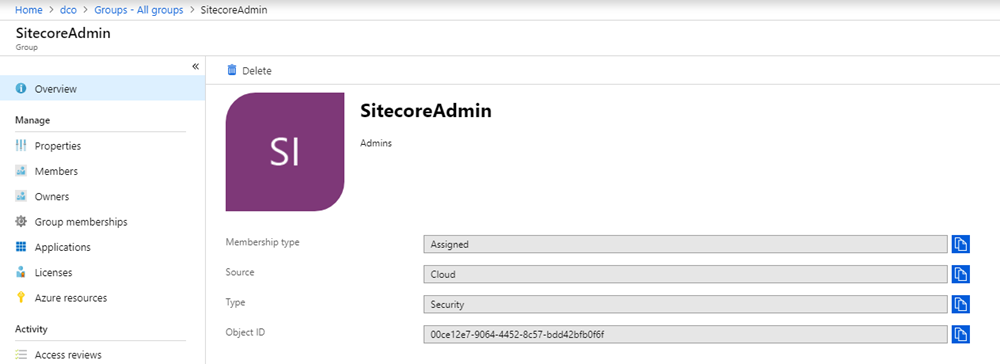
For this walkthrough, we're going to map a group in our Active Directory named "SitecoreAdmin", which will become Administrators in our Sitecore instance.
First, find your group in AD that you'll use for admin membership, and open it up (or create a new group if you currently don't have a group in place). You'll note that it has a GUID for the Object ID. You'll want to copy that out for our next step:
Next, open up the /Sitecore/Sitecore.Plugin.IdentityProvider.AzureAd.xml on your Sitecore Identity Server again. We're going to add a claim mapping of that AD Security Group to Administrator in Sitecore:
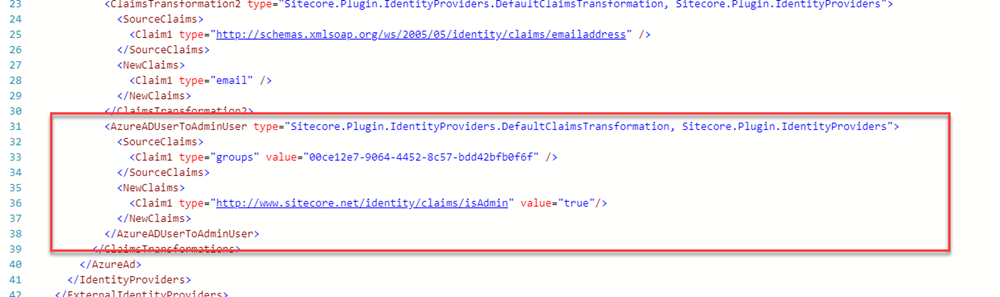
Here, we're looking for the source claim named groups that contains the Object ID of our SitecoreAdmins group. This claim is being passed from Active Directory to our Sitecore Identity Server because we configured "groupMembershipClaims" earlier to pass Security Groups. Below that on the new claims, we're creating a claim that tells Sitecore this user is an Administrator.
Save your config, and restart your Sitecore Identity App Service. Let's try this again:
What now?
This is the first step in getting your AD and Sitecore instances integrated. You'll likely want to add additional transformations similar to the one we did above to other Sitecore roles, and you'll also want to map things like the User Names, e-mail addresses and such so that your user data is a little richer. You'll likely want to override or configure the user name generation to be something more relevant to your organization.
**Update: The second post in this series, focusing on additional claim mapping, is now available here
Also, see Part 3: Using Claim Mapping Policy to map nonstandard and custom Azure AD claims
**
But hope this proved helpful, drop a comment below if you have any questions on the process!