
When we last left off on part 1 of this series on Sitecore Identity Server and Azure AD, we had configured an instance of Sitecore and Identity Server to connect with our Azure AD instance, transform group membership in AD to an Administrator in Sitecore, and log them in seamlessly.
This post is part of a series on configuring Sitecore Identity and Azure AD. You can view all posts in this series, covering setup to configuration, here.
This was a good first step, but in this post we'll cover more about mapping claims on this instance, including how to map name, email, and other Sitecore roles. If you're just joining now, part one can be viewed here. Afterwards, Part 3 will walk you through setting up Claim Mapping Policies in Azure AD for mapping nonstandard and custom AD attributes. That post is available here.
Why should I map more claims?
Valid question! It could be that you're perfectly happy mapping only the bare necessities and making everyone an administrator in Sitecore. But more likely, you'll want to assign certain OU's in your Active Directory to map to different roles in your Sitecore instance – Content Authors, Approvers, Publishers – you name it! So we'll take a look at doing that. Also, by default, your user names are going to be indecipherable. Let's take a look at an image from our last go-round, once we finally got logged in to Sitecore:
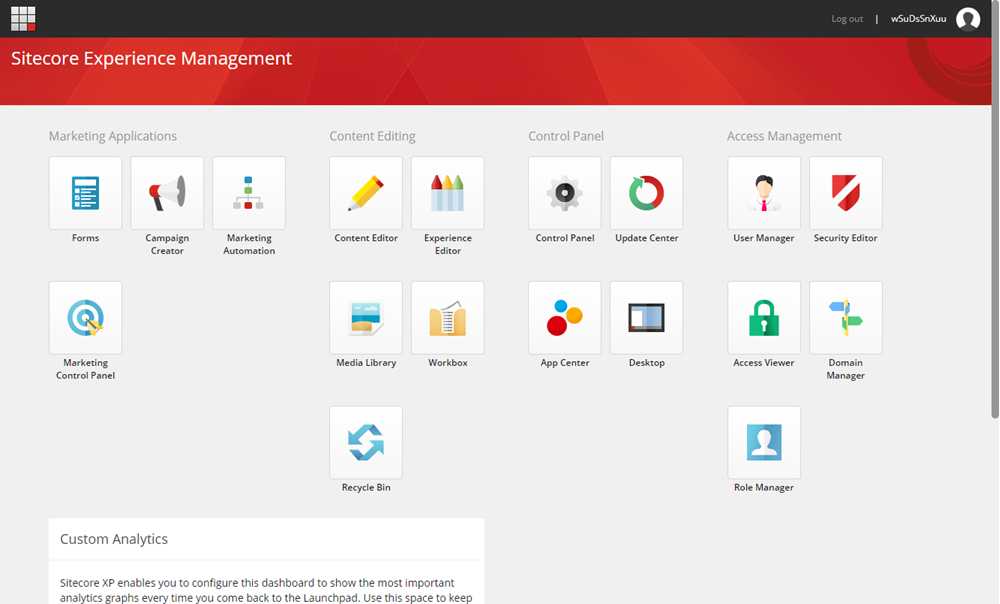
Notice anything strange about our user? Allow me to enhance the upper right corner of that image for you:
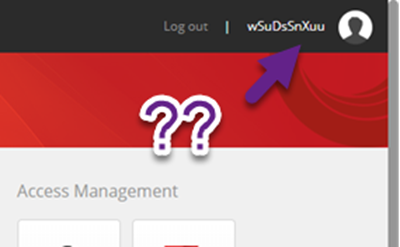
What's happening here? Sitecore needs to ensure that every user coming in from a federated authentication source is unique. Since there's no guarantee that the user information from your identity servers will be unique, Sitecore is creating a unique user – unfortunately, it's a unique user that doesn't have much semblance of a sane naming convention. If you're concerned about the actual methodology of the user accounts being created, you can override Sitecore's default behavior to your own custom behavior. This is done by overriding the Sitecore.Owin.Authentication.Services.DefaultExternalUserBuilder, and is outside the scope of this blog post.
However, it's far more likely that you just want a way to identify the users in your system – by mapping their names, e-mail addresses, or other information from the Identity Providing system. We can do that with claim transformations.
The Basics of Claim Transformation
There are two places you'll need to worry about claim transformation: the Sitecore Identity Server, and the Sitecore server.
- The Sitecore Identity Server should be used to transform any claims from your identity providers to a set standard of claims. For example, if you're federating with multiple identity providers who have different claim names for e-mail, you can transform them to a single formatted claim of your choosing.
- The Sitecore server is responsible for mapping inbound claims from Sitecore Identity Server to your user profile. This must be done at the Sitecore server, as the Sitecore server has the user profile accessible during transformation. You cannot simply name a claim with the same name as a user profile property – you have to transform it at the Sitecore server (This tripped me up for a long time, I'm not ashamed to say).
Example 1: Mapping a user to a different Sitecore group
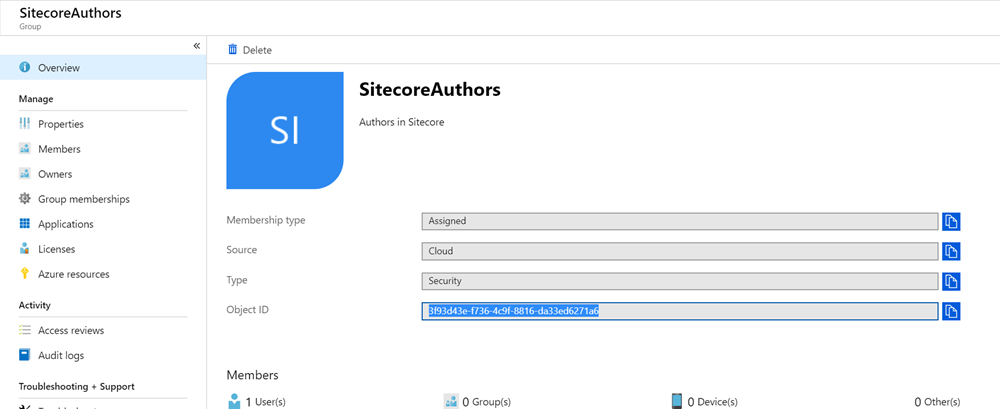
This works very similarly to our previous effort of mapping an Administrator. Our first step will be to visit Azure AD and find the Object ID of the group that we want to map to a Sitecore role:
We'll then take that ID to our configuration on the Sitecore Identity server to the Sitecore.Plugin.IdentityProvider.AzureAd.xml file in the /sitecore/Sitecore.Plugin.IdentityProvider.AzureAd/Config folder, and add a new claim mapping that looks like this:

Breaking this down:
- For inbound claims, we're looking for the claim named "group" from Azure AD. The value we're looking for is the ObjectID of the group we want to map to.
- For the new claim, we're going to transform to the default "role" claim specified, and set it to the value of the role we want to add in Sitecore. In this case, I'm transforming that group membership in to the "Sitecore\Developer" role.
There is no configuration needed for Sitecore, as "role" is understood to map to Sitecore roles. When I log in as a user in that group, the launchpad tells the story of what my access rights assigned are:
One final note: If you have a complex AD mapping where you want to assign roles based on multiple group memberships (IE – People must be in group A and group B to be considered Developers), you can do that! Simply add as many groups as needed in the SourceClaims node as individual sub nodes, like so:
<SourceClaims>
    <Claim1 type="groups" value="00ce12e7-9064-4452-8c57-bdd42bfb0f6f" />
    <Claim2 type="groups" value="5ae32c39-7f1a-481e-801a-3eafef34fa32" />
</SourceClaims>
This only supports AND logic – if you need OR logic, this would need to be two separate ClaimsTransformation nodes.
Example 2: Setting a user's name and e-mail
On to the next point: Making it so your users are identifiable in the Sitecore UI and the User Manager. Again, we'll start by modifying the Sitecore.Plugin.IdentityProvider.AzureAd.xml file in the /sitecore/Sitecore.Plugin.IdentityProvider.AzureAd/Config folder:
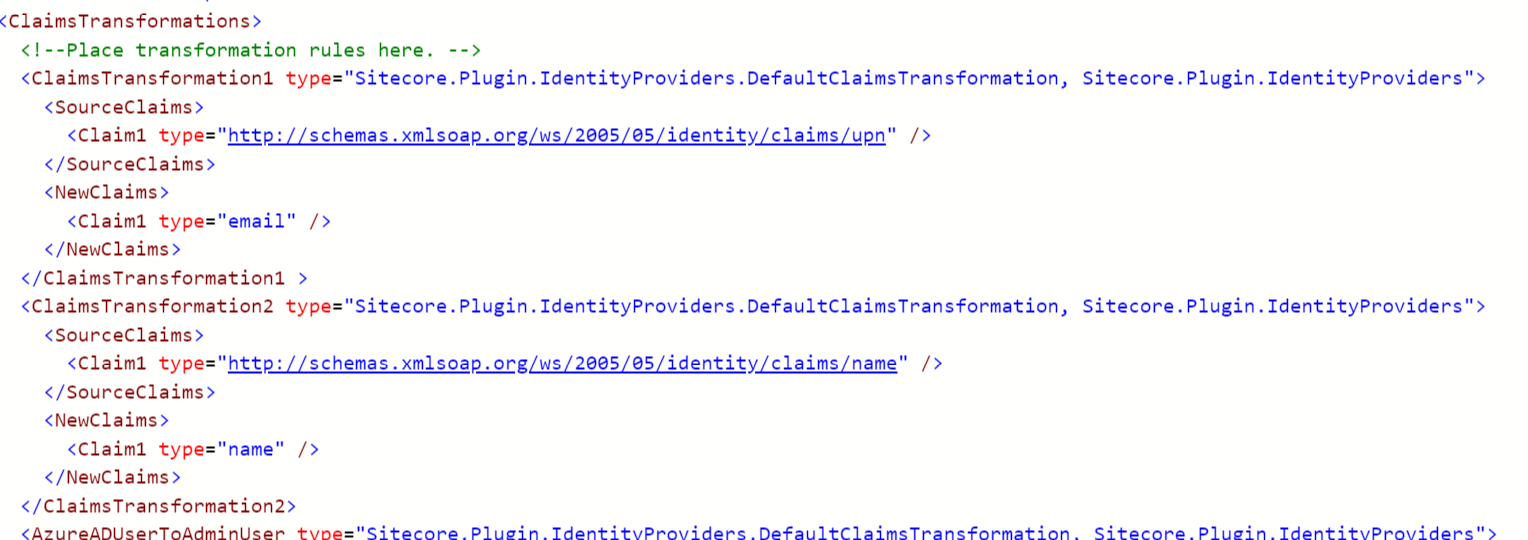
Again, what we're doing here is:
- Identifying the claims that are coming in from Azure AD in the Source Claim nodes. These values are what Azure AD is passing as UPN (which in my Active Directory is our e-mail address) and Name. This can be any claim coming from from your Identity Provider.
- In the NewClaims node, I'm specifying a transformed name to send from Sitecore Identity to my Sitecore instance. Why am I doing this, instead of just passing the claim straight through? Because I want to have consistent claim names between ALL of my Identity Providers. These names can be anything – we will map them in Sitecore configuration.
Next, we'll flip over and map these new claims in Sitecore. We create maps to tell Sitecore when a claim comes in, we want to assign the value to Sitecore's user profile. We do that by adding this to the Sitecore.Owin.Authentication.IdentityServer.config file, in the propertyInitializer section.
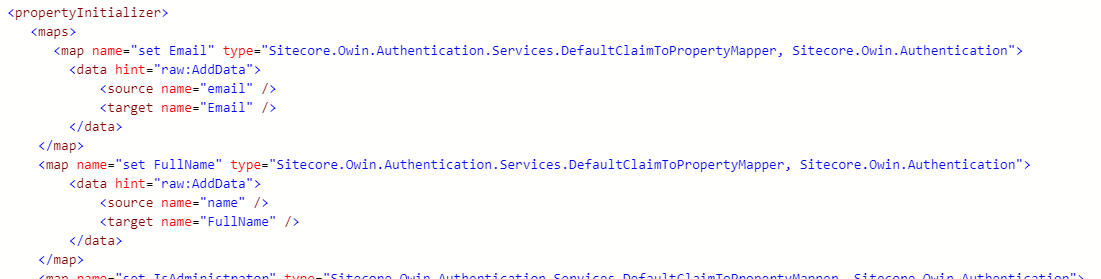
- We create a new map of type Sitecore.Owin.Authentication.Services.DefaultClaimPropertyMapper
- In a child data node, there are two properties: Source and Target.
- Source should be the name of the claim coming in to Sitecore that we want to transform.
- Target is the name of the property on the User Profile we want to map to.
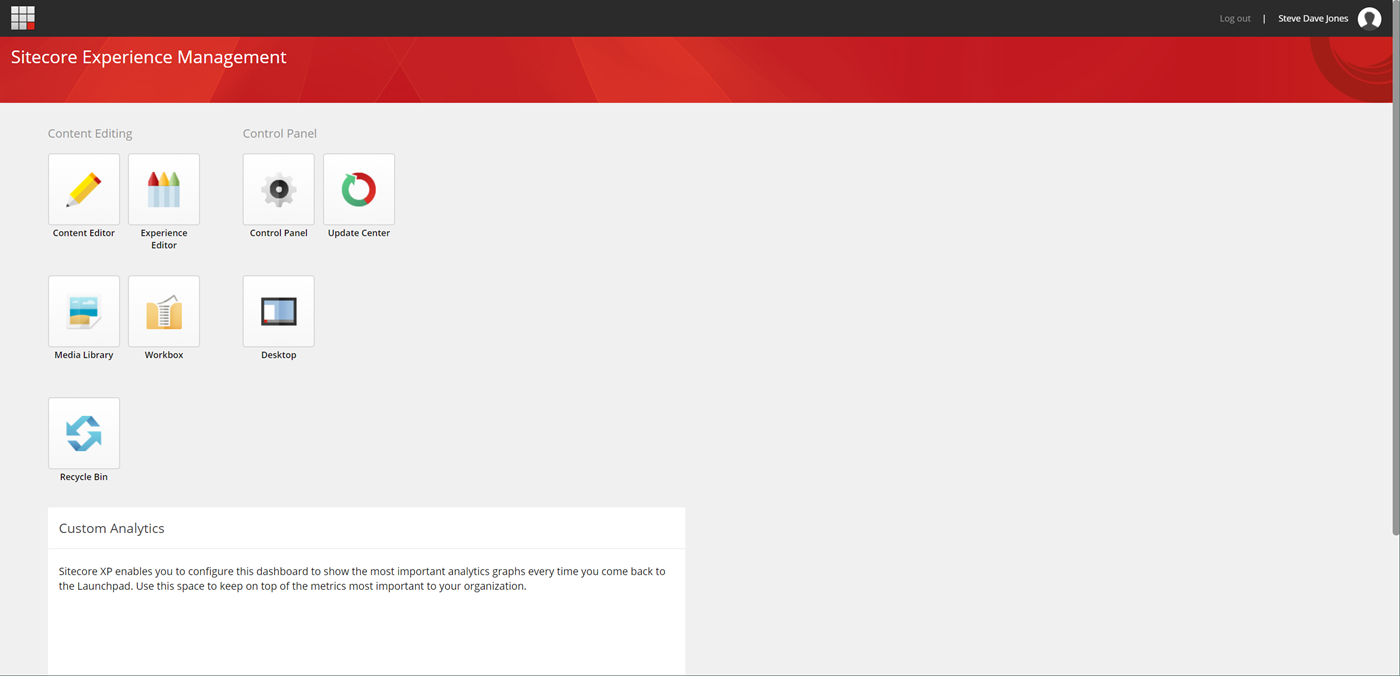
With this configuration in place, recycle both your Sitecore Identity server and the Sitecore instance. On your next login, your user account should look much nicer:

As will your User Manager screen:
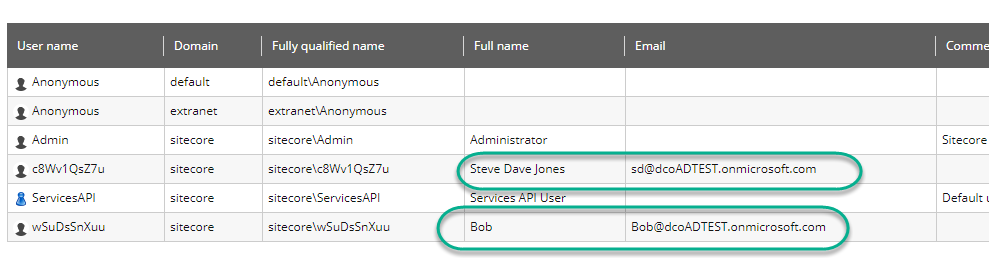
You should be able to map to any property in the User Profile this way. Anecdotally, I've tested:
- Name
- IsAdministrator
- Comment
Acknowledgement
In the process of writing this blog series, I ran in to issues in configuring my instances and claim mappings. So I did what every Sitecore developer does: Open a support ticket! This blog post would not have been possible without the assistance of Tyler Jass, an engineer on our Product Support team at Sitecore. Thank you Tyler, and the other men and women in the support team who get us back on track day in and day out!
Example Files
The configuration files used in this series of posts is available as a Github Gist here for your review.